This article demonstrates how to write a Mozilla extension. It will cover installing extensions into Firefox 0.9+ and Mozilla 1.4+, covering both the common and product-specific technologies such as XPInstall and the new extension API. JavaScript and XUL will be used to implement a sample extension.
Introduction
With the new focus on the new, lean standalone products at Mozilla.org, the extension mechanism has gotten more attention, as they provide the means to add remove or new functionality into the new products.
Prior to FireFox 0.9, extensions in Mozilla-based products were installed using XPInstall, a technology used to replace Netscape 4.x's SmartUpdate feature, which allows a web application to install (after the user agrees) files into the operating system. For example, Sun Microsystems' getjava.com will use XPInstall to install the Java VM and plugin if a mozilla product is detected. XPInstall was expanded to install extensions, but XPUninstall was never completed and has been a constant supplier of grief.
With FireFox 0.9, a new extension installation mechanism has been introduced. While less flexible than XPInstall, it allows uninstallation and updating of installed extensions. The following article will cover the basics of writing and installing an extension in both the old XPInstall way and the new Extension Manager way.
This article will build a sample extension called "Test Extension", which extension writers can modify to build their own extensions on top off. The extension will be a seperate window which will list all browser windows and all loaded pages in each window (including tabs).
Overlay Basics
Mozilla's user interface is written primarily in XUL and JavaScript. The innovative feature that XUL provides that makes extensions work is "overlays". A XUL overlay allows adding new UI elements into an existing XUL window without having to modify the original's code.
Figure 1: Basic structure of an XUL Overlay
    <?xml version="1.0"?>

    <overlay id="testext-overlay"
             xmlns="http://www.mozilla.org/keymaster/gatekeeper/there.is.only.xul">
      ...
    </overlay>
Overlays are usually in seperate files and have the overlay element as their
top-most XML element, as shown in figure 1. In order to append to an existing XUL document,
overlays usually use id attribute matching. For example, to add a new entry into FireFox's
"Tools" menu, which is a menupopup with the id menu_ToolsPopup,
that menupopup is reproduced with its id as a chile of the overlay
element, and the new entry is added as a child of the menupopup:
    XUL Window:
      ...
      <menupopup id="menu_ToolsPopup">
        ...
      </menupopup>
      ...

    Overlay:
      <?xml version="1.0"?>

      <overlay id="testext-overlay"
               xmlns="http://www.mozilla.org/keymaster/gatekeeper/there.is.only.xul">

        <menupopup id="menu_ToolsPopup">
          <menuitem label="Test Extension" accesskey="x"/>
        </menupopup>

      </overlay>
The new menuitem will be appended to the tools menu.
To read more about XUL Overlays, please refer to XULPlanet's guide.
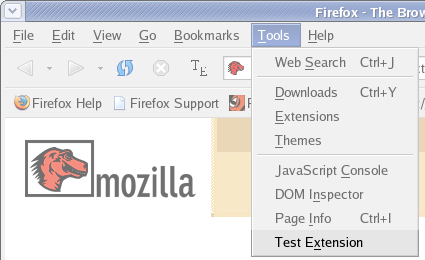
FireFox Overlay Hooks
The sample extension we are building needs its own window, and FireFox has 2 places to hook into
for this - the Tools menu and the customizable toolbar. The overlay used
for FireFox is called testext-fb-overlay.xul.
The overlay code for the Tools menu was covered in the previous chapter and now
needs to be extended to open a new window when invoked:
      <?xml version="1.0"?>

      <overlay id="testext-fb-overlay"
               xmlns="http://www.mozilla.org/keymaster/gatekeeper/there.is.only.xul">

        // overlay an entry into FireFox's Tools menu
        <menupopup id="menu_ToolsPopup">
          <menuitem id="testextension-menuitem" label="Test Extension"
          accesskey="x"
          oncommand="testext_init()"/>
        </menupopup>

      </overlay>
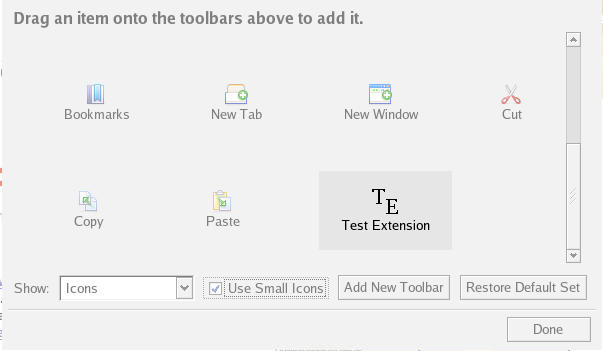
Next comes the toolbar item. This is done by adding an element into the
toolbarpalette element, which contains all possible toolbar items (both visible
and not):
      testext-fb-overlay.xul:

        <?xml version="1.0"?>

        <?xml-stylesheet href="testextension-overlay.css" type="text/css"?>
        <overlay id="testext-fb-overlay"
                 xmlns="http://www.mozilla.org/keymaster/gatekeeper/there.is.only.xul">
          ...

          // overlay an entry into the toolbar customization panel
          <toolbarpalette id="BrowserToolbarPalette">
            <toolbarbutton class="toolbarbutton-1" id="testextension-fb-overlay-button"
                           label="Test Extension" oncommand="testext_init()"
                           tooltiptext="The Test Extension"/>
          </toolbarpalette>

        </overlay>

      testextension-overlay.css:

        #testextension-fb-overlay-button {
          list-style-image: url("chrome://testextension/content/logo.gif");
        }

        toolbar[iconsize="small"] #testextension-fb-overlay-button {
          list-style-image: url("chrome://testextension/content/logo-sm.gif");
        }
As can be seen in the above figure, a toolbarbutton is added to the
toolbarpalette element for the browser. In order to have an image appear,
a CSS file called testextension-overlay.css is included, which defines an image for normal sized or small sized toolbar item sizes,
which are user selectable. CSS files are included in XUL using the xml-stylesheet
processing instruction.
Since both the toolbar item and the tools menu entry both have to open our extension's
window, they currently use oncommand="testext_init()" to do so. XUL provides
a feature called "commands", which allows to define a command and what it should do when called.
XUL widgets can then reference the command using the command attribute:
      testext-fb-overlay.xul:

        <?xml version="1.0"?>

        <?xml-stylesheet href="testextension-overlay.css" type="text/css"?>
        <overlay id="testext-fb-overlay"
                 xmlns="http://www.mozilla.org/keymaster/gatekeeper/there.is.only.xul">

          <commandset id="mainCommandSet">
            <command id="Tasks:TestExt" oncommand="testext_init()"/>
          </commandset>

          // overlay an entry into FireFox's Tools menu
          <menupopup id="menu_ToolsPopup">
            <menuitem id="testextension-menuitem" label="Test Extension"
                         accesskey="x" command="Tasks:TestExt"/>

          // overlay an entry into the toolbar customization panel
          <toolbarpalette id="BrowserToolbarPalette">
            <toolbarbutton class="toolbarbutton-1" id="testextension-fb-overlay-button"
                              label="Test Extension" command="Tasks:TestExt"
                              tooltiptext="The Test Extension"/>
          </toolbarpalette>

        </overlay>
Localization
Since not everyone speaks english, Mozilla provides a simple, yet powerfull way to localize
XUL using XML entities. All text is moved to a seperate .dtd (Document Type Definition) file
and each string is given a unique name, which can then be referenced in XUL using the
&entity-name; syntax. The .dtd file is referenced in the XUL file by using
the doctype element as such:
      testext-fb-overlay.xul:

        <!DOCTYPE overlay SYSTEM "chrome://testextension/locale/testextension.dtd">
        <overlay id="testext-fb-overlay"
                 xmlns="http://www.mozilla.org/keymaster/gatekeeper/there.is.only.xul">

          <menuitem id="testextension-menuitem" label="&testextension.name;"
                    accesskey="&testextension-menuitem.accesskey;"/>

      testextension.dtd:

        <!ENTITY testextension.name "Test Extension">
        <!ENTITY testextension-menuitem.accesskey "x">
Every entity in the .dtd file is declared in an <!ENTITY> (note that closing
tags are not to be used in the .dtd file). Each declaration has a unique name and a value
associated with it. When packaged (which is handled in detail in that section),
the locale/ directory of the extension can contain directories for each
supporated language, such as "en-US" or "de-AT". Mozilla will automatically select the
one depending on the user's language settings.
As can be seen in figure 6, not just text can be localized, but any other value, such as accesskey or tooltip values, which may be different for different languages.
Here is FireFox's overlay, completely localized.
Figure 7:
      testext-fb-overlay.xul:

        <?xml version="1.0"?>

        <!DOCTYPE overlay SYSTEM "chrome://testextension/locale/testextension.dtd">
        <?xml-stylesheet href="chrome://testextension/skin/testextension-overlay.css" type="text/css"?>

        <overlay id="testext-fb-overlay"
                 xmlns="http://www.mozilla.org/keymaster/gatekeeper/there.is.only.xul">

          <script type="application/x-javascript" src="chrome://testextension/content/testext.js"/>

          <commandset id="mainCommandSet">
            <command id="Tasks:TestExt" oncommand="testext_init()"/>
          </commandset>

          // overlay an entry into FireFox's Tools menu
          <menupopup id="menu_ToolsPopup">
            <menuitem id="testextension-menuitem" label="&testextension.name;"
                      accesskey="&testextension-menuitem.accesskey;"
                      command="Tasks:TestExt" />
          </menupopup>

          // overlay an entry into the toolbar customization panel
          <toolbarpalette id="BrowserToolbarPalette">
            <toolbarbutton class="toolbarbutton-1" id="testextension-fb-overlay-button"
                           label="&testextension.name;" command="Tasks:TestExt"
                           tooltiptext="&testextension-toolbar.tooltiptext;" />
          </toolbarpalette>

        </overlay>

      testextension.dtd:
        <!-- Common -->
        <!ENTITY testextension.name "Test Extension">
        <!ENTITY testextension.version "0.1">
        <!ENTITY testextension.homepage "http://www.nexgenmedia.net/docs/extensions/">
        <!ENTITY testextension.author "Doron Rosenberg">

        <!-- Menu item -->
        <!ENTITY testextension-menuitem.accesskey "x">

        <!-- Toolbar item -->
        <!ENTITY testextension-toolbar.tooltiptext "The Test Extension">
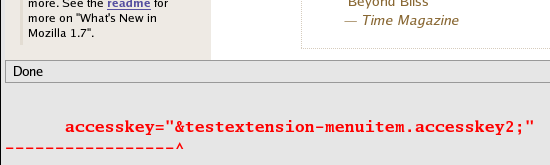
Localizing can often lead to bugs such as mispelling an entitiy's name - Mozilla will report this by showing at the bottom of the screen in big, red letters the part in the overlay's XUL code where an referenced entity could not be found:
Extension Structure
Extensions have a strict structure that has to be followed. Inside the root directory for the extension (for the sample extension, it will be testextension/), the install scripts (install.js for Mozilla and install.rdf for Firefox 0.9+) and the chrome directoty exist. The chrome directory will hold the actual files that implement the extension. The chrome directory itself has three sub-directories: content/, which holds the user interface files (XUL and JavaScript), locale/, where the localizations are stored, and skin/, where theme-specific files are held.
Figure 7:
      testextension/
          chrome/
              content/
                  testextension/
                      about.xul
                      contents.rdf
                      logo.gif
                      logo-sm.gif
                      testext-fb-overlay.xul
              locale/
                  en-US/
                      testextension/
                          contents.rdf
                          testextension.dtd
              skin/
                  classic/
                      testextension/
                          contents.rdf
                          testextension-overlay.css
          install.rdf  // FireFox 0.9+
          install.js   // Seamonkey
The contents.rdf file found in each directory is used to register the files into
the chrome registry. As can be seen in the figures, extension files are referenced
using the chrome:// protocol, such as
chrome://testextension/locale/testextension.dtd for example. chrome.rdf files
are used to register locales, overlays and skins.
To register a locale for the extension, the chrome.rdf in the locale/ directory has to define what language (en-US for english for example) to use the directory for:
Figure 7:
      <?xml version="1.0"?>

      <RDF:RDF xmlns:chrome="http://www.mozilla.org/rdf/chrome#"
                  xmlns:RDF="http://www.w3.org/1999/02/22-rdf-syntax-ns#">

        <RDF:Seq about="urn:mozilla:locale:root">
          <RDF:li resource="urn:mozilla:locale:en-US"/>
        </RDF:Seq>

        <RDF:Description about="urn:mozilla:locale:en-US"
                            chrome:author="Doron Rosenberg"
                            chrome:displayName="English(US)"
                            chrome:name="en-US">
          <chrome:packages>
            <RDF:Seq about="urn:mozilla:locale:en-US:packages">
              <RDF:li resource="urn:mozilla:locale:en-US:testextension"/>
            </RDF:Seq>
          </chrome:packages>
        </RDF:Description>
      </RDF:RDF>